Thursday, 16 February 2012

Reverb

Hello again! Did anyone get any nice nerdy musical gifts for Valentines day? And yes it is possible!           

So far we’ve built up our mix levels, edited out noise on the drums and checked phasing and low end noise with the high pass filters.

Reverb

Next we have a look at setting up a reverb. What’s reverb? Well it’s a room. It gives another dimension, depth, to a mix. Initially I’m talking short reverbs. Most novices slap George Michael style sweeping reverbs on everything. That leads to swampy muddy mixes. So let’s avoid those big verbs for just a moment.

I almost always create a “master reverb”. That represents the false room that the band are playing in. If you add a portion of each sound into that reverb then you get that depth.

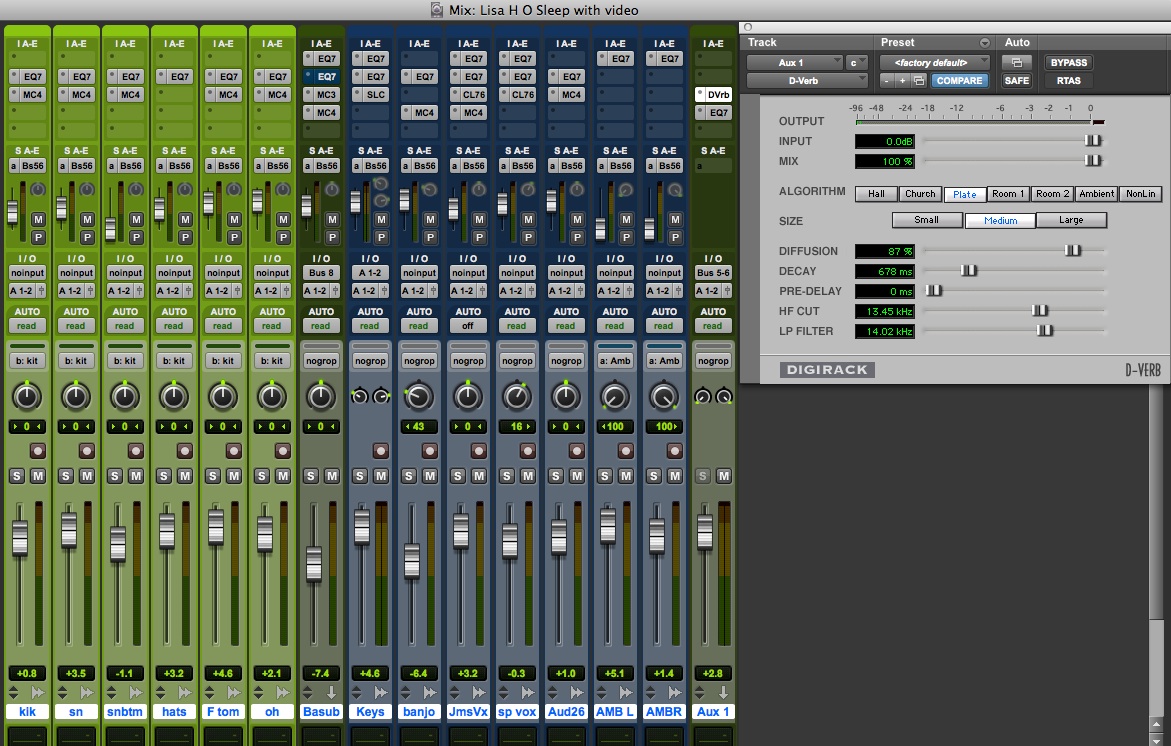
Typical reverb setup. Note "busses" to send signal to reverb.
How you do that is you create a new stereo Auxiliary track on your system. Then put a reverb on that auxiliary track and set the reverb time to around 0.5-0.75 seconds. Once that is done, set the input of that track to allow you to send signal to it internally. For example in Pro Tools you will get an option of “interface” or “buss”. Choose “bus”.

Once your reverb track is setup what you have to do next is create an “auxiliary send” on each and every track you have recorded. Make sure that auxiliary send is set to the same as the input on the auxiliary reverb track. If you then turn up that aux send you’ll hear reverb.

By creating one master reverb you not only add a consistency to the room sound in the mix, you also take the load off of the computers CPU as reverbs in particular kill your computer when you have too many!

Raise the sends one by one. You’ll find that by increasing the reverb and decreasing the volume of the track that track seems to fall into the background somewhat. Experiment with this to give all the instruments their place. Be careful not to put too much on your vocal or main melody instrument though as they could get lost in the mire.

That’s it for today. I’ve been answering questions on the email address below. Please pop me an email if you want a question answered. I don’t consider any question “stupid” unless you already know the answer!

Also if you want to do the STC Intro to recording course then call Maggie on 01 6709033.

Thanks for reading,

Andy Knightley

www.krecording.com

Monday, 13 February 2012

Levels

So, over the last week and a bit we’ve been through Phasing, High pass filters and drum editing. I’ve been deliberately keeping it simple for all to understand. A lot of people do come to me with way more complicated questions regarding mixing but I often find that it’s the simple things that are not understood. Once the foundations are there it’s easier to build a mix on top of it.

Levels

We’ll look at Levels today. A basic point but they really are the fundamental that all mixes are built on.

OK, so load up your mix and turn everything down. The first thing that should be turned up is, more than likely, the vocal. 9 times out of 10 it’s the focal point of the mix. All your other levels are based around this. So get it up there at a nice level. Watch your meters, if it’s too high then adding more stuff could well make the whole mix distort, and we don’t want that!

Next we want to look at the core melody. It’ll either be guitars or a keyboard line or the like. Turn it up to a point that the vocal is still clearly heard and not drowned out.

The rhythm section is next. Again, turn up each instrument so they fit with the previous instrument. You will need to manually move levels during the song, like in a guitar solo, but just forget that at the moment. Just get the core stuff right first.

When it comes to drums, it’s always best to “group” all of the drum channels together. Most programmes have a way of allowing all of the levels of a certain instrument to be turned up or down at the same time. By doing this you can raise the whole kit without worrying about ruining the balance you already set for the drums.        
Typical Krecording mix balancing.
Lastly once the drums are up, throw up the bass. Don’t turn it up so the kick drum is drowned out. Let both be heard.

You’ll find having done this that you’ll notice that, let’s say, the rhythm guitar is muddy. If that’s the case then you can think about eq. But that’s a whole ‘nother article or 6!

That’s it for today. Hopefully I’ve left you with a relatively well balanced mix. You can look to the other articles in this blog to help you tweak it. I’ll be back by the end of this week with the next part.

Don’t forget to email me any questions you want about recording or mixing. No question is too stupid unless you already know the answer!

Also if you want to do the STC “Intro to recording course” then call Maggie on 01 6709033.

Thanks for reading,

Andy Knightley

www.krecording.com

Thursday, 9 February 2012

Drum Cleaning

Time for another instalment of Simple Mix Tricks!

In this article we take a look at a drum kit and the nasty little problems that crop up when they’ve already been recorded.

Lets say you’ve recorded a drum kit. Normally you’ll have about 8 separate tracks. Kick drum, snare drum top and bottom, hi hats, rack and floor tom and two cymbal microphones. Throw up a balanced mix and, as we talked about in previous articles, have a play around with the phasing and the high pass filter. That should have your kit sounding much tighter.

Next take a listen to the toms by themselves. As the rest of the kit is playing those toms will be singing along even though they’re not being hit. That’s a big problem when you’re looking to get a tight punchy kit.

I’ll assume you’re working on a computer right now (if you aren’t….. well done, rather you then me!). Zoom right in on the toms. You’ll be able to see the spikes where the toms are being hit right there on the screen. Delete anywhere there isn’t a tom hit.

If you listen back to the drum kit now you’ll notice that your kick and snare drum are way more defined. The drone that you probably barely noticed is gone and makes everything much cleaner.

The toms are the only tracks I’d be so brutal with on the kit. You could go and delete other extra noise but be careful that it doesn’t start sounding like a drum machine.

NEVER delete cymbal tracks if the drums aren’t playing during the song. If the drums have been in already your ears will have become used to the room sound that the drums are in. If it’s deleted you’ll notice it straight away!

That’s it for today. I’ve been answering questions on the email address below. Please pop me an email if you want a question answered. I don’t consider any question “stupid” unless you already know the answer!

Also if you want to do the STC Intro to recording course then call Maggie on 01 6709033.

Thanks for reading,

Andy Knightley

www.krecording.com
info@krecording.com

Monday, 6 February 2012

High pass filters

I have to start this blog by saying thanks to all those who read the first article. I was delighted that so many wanted to hear my inane nerdy drivel.

I never explained anything about myself in the first edition and I won’t here either. Just head over to www.krecording.com and you’ll see for yourself.

High pass filters

Todays blog is all about high pass filtering. It’s quite a simple concept. Again, like phasing, if you just take a few minutes to pay attention to where it’s needed in your mix then it’ll make a difference.

A high pass filter cuts low frequencies. That is it only lets “High” frequencies “Pass”. It’s a very simple thing but you’ll find just applying it to a handful of tracks will make the low end of your mix much tighter.

On the right is a typical EQ plugin. You can see this is set to High-Pass (HPF) and the frequency that the cut starts from is at 100Hz. You can adjust that number to whatever you want.

So if you’re cutting low frequencies obviously you don’t want to touch kick drum and bass. Unless you’re, you know, dim.

On a typical band mix go straight for the hi-hat. Put an HPF on it and set the frequency high enough so you cut unwanted low stuff but low enough so you aren’t making the hat sound like it’s being hit with a chopstick.

Repeat this for the cymbal tracks and any other tracks that doesn’t need low frequencies, even the snare drum, and you’ll quickly find that your kick drum sounds way more defined. Just be careful you aren’t setting them too high. When in doubt back it off.

You can apply this across lots of tracks: Vocals, guitars, keyboards, synths etc.

Once you have them set, play your mix back at a section where all the instruments are playing, like a chorus. Have a listen to it and then, while it’s playing, turn off all the HPFs. Does it make a difference? It may be small but it all counts to making your mix tighter.

I’ll be back in a few days with another article. Please feel free to email me questions. I’ll be doing a blog later answering questions.

Also if you want to do the course then call Maggie at The Sound Training Centre on 01 6709033.

Thanks for reading,

Andy Knightley

www.krecording.com

Friday, 3 February 2012


Introduction and Phasing

Hi Folks,

As part of the new "Introduction to recording" weekend course which is soon to be held in The Sound Training Centre, Dublin I thought it might be a cool idea to blog about some tips and tricks to do with audio mixing.

We'll be going through the actual microphone techniques in the course but there are a few mixing tips that could help you improve your sounds.

Phasing
Phasing. Snore! Well it may not be the most exciting topic when we talk mixing but using it properly makes a massive difference to how your mix will sound.

If you have more than one microphone pointing at an instrument there's a danger the two sounds heard could phase. That means frequencies could cancel each other out and your instrument sounds really thin and generally manky.
I'm not going to get too technical on this matter for the sake of this blog but suffice to say it's a problem that can be fixed easily by moving one of the microphones until the sound is right. If you're stuck with the sound, having being already recorded, though that's a different matter.

Every piece of software weather it's Pro Tools or Cubase, Logic or Sonar, will have some form of phase reverse on each channel. Here we have a typical Pro Tools plug-in. The Phase reverse button is the circle with the diagonal line through it on the right.

Let's say you have two microphones on an acoustic guitar. Well pan them to the center and put a phase reverse on one of the channels. Does the sound get weedy? Well then your phase is fine, take the phase reverse off and be happy you are truly blessed with a god given technique for capturing an acoustic guitar. Does the sound get thicker, more full? Well then you have a phase reverse problem. But thanks to pressing that button it's now solved.

You come across phasing in every aspect of live recording. The best way to deal with it is start hitting those phase reverse buttons and listen to what happens. Check out Drum kits, Bass Mics/DIs and Room mics in particular. You'll find that before you even touch EQ or compression your sound will already be better than it was.

That's it for this week. I'll aim to have one of these every week until the course starts. If you have any questions about mixing then send them to me and I'll try to incorprate them into the blog. 

Also if you want to do the course then call Maggie on 01 6709033.

Thanks for reading

Andy Knightley
www.krecording.com
info@krecording.com