Monday 27 February 2012

Keyboards

Hi folks. 

I’ve decided that this is the last week of the blog, at least for a while. I’ll be posting one more on Thursday and then a free for all Q&A on Friday. So thank you in advance for all your nice comments and views. Please follow @krecording on Twitter or “like” Krecording on Facebook.

Leave comments on Facebook or get in touch on Twitter or info@krecording.com for all your questions.

Keyboards

Keyboards can seem very easy to record as all you mostly have to do is plug them straight in or, even easier, trigger them within the software. They do however have a tendency to take over the track if they aren't dealt with correctly.

Before you even put the keyboard in the mix make sure that it is routed to the mix on a stereo track. If it’s a mono sound then leave it in mono, I’ll get to that in a sec. By putting the sound on a stereo track you can use one stereo compressor to keep a handle on the levels. Also one stereo EQ is far easier to use than two mono EQs.

Keyboards can have a great variety of sounds, from sharp attacking piano to slow moody “Blade Runner” style pads. I’ll give you some basic guidelines where you can start from, these aren’t rules but they may give you a head start.
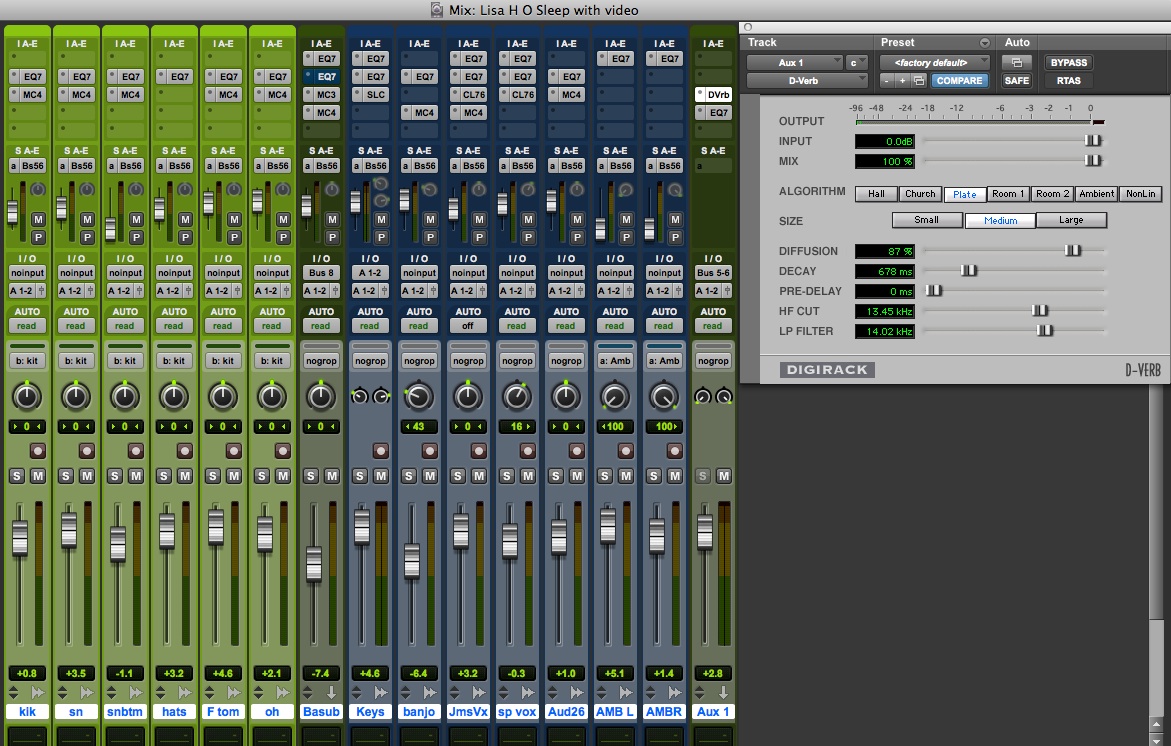
When you set up the track put an EQ and then a compressor plug in on the keyboard track. If you have a short sharp sound keep the release fast on the compressor and the attack fairly fast. If it’s a pad use a fast attack and a slow release.
Mini grand piano with EQ and Compression

As far as the EQ goes, turn the keys up in the mix and listen to what frequencies are “clouding’ the mix. Use your EQ to turn these frequencies down. You don’t need to completely lose that frequency, just turn it down a bit. You’ll hopefully now find that your keyboard, once turned back to a reasonable level, is sitting somewhat better in the mix.

When it comes to mono keys the method is pretty much the same, just use the panning to find a place in the mix where the keyboard is heard.

Thursdays blog will be about EQ and Fridays Q&A will take EQ questions but feel free to ask me anything and I’ll do my best to answer all.

The course that I’m teaching is on this weekend. There is still one or two places available. If you are interested in learning more about recording and mixing then please get in touch with Maggie in STC on 01-6709033.

Regards,

Andy Knightley

Friday 24 February 2012

Compression Q&A

Compression Q&A

So I received a few questions about compression. Here's a selection.

What's a "better" deal? Low comp rates and squashing thresholds, or higher comp rates with less "threshold pressure"? Any personal / particular notes on attack / release controls?

I find this depends on what you're compressing. If you are compressing a vocal I tend to use fairly high ratios but on a guitar they are much lower (3:1 or thereabouts). You can get away with a lot of compression on a vocal, especially a rock vocal then you can with an acoustic guitar for example.


If I compress a mix I would use very low ratios (1.5:1).


In terms of attack, like everything it depends on the source. If it's drums i tend to slow the attack so i don't ruin the bite of the drum. On a vocal I'd have the attack pretty fast to catch the first syllable.

With release I'd set it pretty fast on short, quick sounds and slower on the slower sounds. Fast being drums for example, slow being distorted rhythm guitars and  slow tempo vocals.


What software compressors do you recommend?


On the higher end I'd recommend the Waves CLA classic compressors. They are software versions of compressors used in most big studios. They sound really good and are pretty intuitive.


I'd also recommend Massey's CT4 compressor. It's very basic to look at the plug in itself is very cheap to buy and you can run lots on even the slowest computer.


Of course don't forget the compressors that come with your software. I find a lot of them don't like being stretched but they do well to give you a consistent level.


On the final mix,whats best for overall compression? 

I find, as mentioned before, that a low ratio is good on an overall mix. Couple this with a slow attack to let the mix bite and a fast release the give it punch and you should be heading in the right direction.


That's it for this Q&A. I'll be back on Monday with another blog. Don't forget if you want to learn about this and more then you'll like STCs weekend course starting on March 3+4.


Regards 

Andy


info@krecording.com
www.krecording.com

Thursday 23 February 2012

Compression

Hi again, After today's blog I’ll be putting up a Q&A blog about compression. So if you have any questions regarding compression contact me on @krecording on Twitter or Krecording on Facebook.

Also as you may or may not know I will be teaching a weekend course in The Sound Training Centre, Temple Bar, on March 3rd and 4th. If you want to learn more about what we’ve discussed and how to record individual instruments then call Maggie on 01-6709033.

The course fee is refundable should you decide to do any of their diploma courses!

Compression

So compression is seen as a bit of a dark art. It’s nothing to be afraid of but it does take a bit of getting used to.

What a compressor does is squash the loud parts of the sound to give you a consistent volume level. For example if I was to whisper into a microphone that was running through a compressor and then shout loudly the overall volume of my voice shouldn’t get much louder. If it’s set right of course.

In its most basic form a compressor is like having someone control the levels for you. But of course it’s way too hairy to just leave it at that.

There are 5 main elements to a compressor.

Typical software compressor (Pro Tools)
Threshold: That’s the level that compression starts at.

Ratio: The amount of compression

Attack: How quickly compression starts

Release: How quickly compression stops.

Makeup Gain: Overall volume.

As a mixer I would use compression on 90% of tracks if not more. It’s a great way of getting levels to remain consistent and to beef up a track.

As an experiment, set up a microphone in the room that a drum kit is in and put a compressor on it. Set the threshold low and the ratio high. Set the attack reasonably fast and the release really fast. All of a sudden the drum kit sounds really beefy and dirty. You’ll probably get tons of cymbal wash too.
Waves CLA series compressor

When you do set up a compressor, don’t be afraid to be brutal with it. If you can’t hear what’s going on then crank it. You’ll soon start realising how the compression is working and therefore you’ll back it off to make it give a more subtle effect.


That's it for compression. Remember to ask me questions and I'll answer as many as i can.
Andy Knightley
Info@krecording.com

Monday 20 February 2012

Bass Guitar

If you want to be up to date with the blog please follow @krecording on Twitter or Krecording for our Facebook page.

I’ll also put regular deals up there for artists looking to record or mix material.

Bass Guitar

I normally set up a bass guitar so there’s a mic on the amp and a direct signal coming from the bass itself or a “DI” output from the amp. Most amps have an output marked “DI” this is the signal that comes straight out of the guitar before being effected by the amp circuitry. I’ll concentrate on the hows and whys of microphone technique at a later date so here we’ll look at getting it into a mix.

This obviously shows up as two separate tracks in your mix. One marked “Bass Amp” the other “Bass DI”. Before you start grabbing the EQ or compression have a listen to the two tracks. The amp track should be a bit grungy sounding, depending on what sound you are going for, and the DI should be quite clean. The basic idea behind having the two tracks is that the amp will give you the oomph and grit that you need whereas the DI will give you the clarity and low end that could be lost by getting that grit from the amp.

Note the routing and phase reverse on the plug in
We talked about phasing earlier so here’s a chance to see if it’s getting in the way of our bass sound. Both of these tracks are from the same bass but the microphone will take longer to receive the sound than the DI that is hooked up to the guitar itself. So that means there’s a danger of phasing. Turn both tracks up to the same level and phase reverse one of them. Does it sound better? Well then keep that button pressed. If it sounds worse of course then get rid of the phase reverse.

Now that the two tracks are in phase with each other your next step is to raise and lower the levels until you get a nice blend between the two tracks. Remember, too much DI and you’ll lose the meatiness, too much amp and you’ll lose clarity.

Next set up a mono auxiliary track. Change the outputs of the bass tracks so that they run to the inputs of the auxiliary track. This means that you can control the level of the bass without changing the blend between mic and DI and also you can EQ and compress the two tracks in one fell swoop.

I’m going to get into EQ and compression soon but that’s it for the moment. You’ll find that even these small items can make the world of difference to the bass.

My next blog will be Thursday and it’ll be about compression. If you have any questions on compression or your bass sounds please either post comments on FB, contact me on Twitter or email info@krecording.com.

Remember I will be teaching a weekend introduction to recording and mixing course in STC Temple Bar on March 3rd-4th. We’ll be going through everything from sound cards, mixing desks and microphones to EQ, compression and effects. It’s going to be a great weekend so if you are interested call Maggie on 01-6709033.

Andy Knightley
Info@krecording.com

Friday 17 February 2012

Reverb Q&A


I promised I'd put some of the questions I've received into the blog so here we go.
Don't forget to check out the new videos at www.krecording.com!

Reverb Questions:

How much is too much? Also any info you have on "distinctive" reverb sounds and tricks of the trade to get/avoid them would be great, so i don't end up sounding like Bon Jovi circa 1988! Thanks!

I think the two questions are one in the same. Generally speaking if you load your mix with a ton of reverb and other FX, you are stamping a big “I MADE THIS IN (add your date)!”

Let the song and performances shine through. Listen to Dylan or early Beatles.

Also if you want to have a specific type of reverb from a song you like, try and research what piece of equipment was used. You can get plug in versions of classic reverb units like those made by Lexicon, Eventide, EMT etc.

Which software plug ins would you recommend, if any?

I’ll start by saying I’m not endorsed by any company so these are my opinion and mine only.
Lexicon PCM

Lexicon PCM:
Really great if a little pricey. It comes with a bunch of presets to get you started. Lexicon is probably the best known studio reverb. Almost every large studio worth its salt has one.

TL Space/Altiverb:
Two convolution reverbs. That is they recreate real spaces. You can put your bathroom reverb into these units. Alternatively you can pick up tons of files online from people who have already done the hard work! And for no cost.
TL Space

Your default reverb:
Don’t dismiss the reverbs that came packaged with your software. They are usually quite workable and low on processing power.

What are some good techniques for mixing wet and dry signals?

If you check out the reverb part of the blog you’ll see how you should hook up the reverb in your mix. The classic “wet/dry” is replaced by a much easier auxiliary set up.

If you want something 100% covered in reverb though, the best bet is to put a reverb set to 100% wet on that track.

Why does Pro Tools reverb sound sh**e?

Back to my previous question, no DAW reverb is out and out bad. It just mightn’t be suited to what you want it for. I still use the on board Pro Tools reverb. It’s particularly interesting when you set the reverb time to infinite!

When do I not use Reverb?

There’s no hard and fast rules but generally speaking if you want a really close sounding vocal, I’m thinking about some Glen Hansard/Frames tunes for example, you would use very little or no reverb.

Any future questions email me at:


Thursday 16 February 2012

Reverb

Hello again! Did anyone get any nice nerdy musical gifts for Valentines day? And yes it is possible!           

So far we’ve built up our mix levels, edited out noise on the drums and checked phasing and low end noise with the high pass filters.

Reverb

Next we have a look at setting up a reverb. What’s reverb? Well it’s a room. It gives another dimension, depth, to a mix. Initially I’m talking short reverbs. Most novices slap George Michael style sweeping reverbs on everything. That leads to swampy muddy mixes. So let’s avoid those big verbs for just a moment.

I almost always create a “master reverb”. That represents the false room that the band are playing in. If you add a portion of each sound into that reverb then you get that depth.

Typical reverb setup. Note "busses" to send signal to reverb.
How you do that is you create a new stereo Auxiliary track on your system. Then put a reverb on that auxiliary track and set the reverb time to around 0.5-0.75 seconds. Once that is done, set the input of that track to allow you to send signal to it internally. For example in Pro Tools you will get an option of “interface” or “buss”. Choose “bus”.

Once your reverb track is setup what you have to do next is create an “auxiliary send” on each and every track you have recorded. Make sure that auxiliary send is set to the same as the input on the auxiliary reverb track. If you then turn up that aux send you’ll hear reverb.

By creating one master reverb you not only add a consistency to the room sound in the mix, you also take the load off of the computers CPU as reverbs in particular kill your computer when you have too many!

Raise the sends one by one. You’ll find that by increasing the reverb and decreasing the volume of the track that track seems to fall into the background somewhat. Experiment with this to give all the instruments their place. Be careful not to put too much on your vocal or main melody instrument though as they could get lost in the mire.

That’s it for today. I’ve been answering questions on the email address below. Please pop me an email if you want a question answered. I don’t consider any question “stupid” unless you already know the answer!

Also if you want to do the STC Intro to recording course then call Maggie on 01 6709033.

Thanks for reading,

Andy Knightley

www.krecording.com

Monday 13 February 2012

Levels

So, over the last week and a bit we’ve been through Phasing, High pass filters and drum editing. I’ve been deliberately keeping it simple for all to understand. A lot of people do come to me with way more complicated questions regarding mixing but I often find that it’s the simple things that are not understood. Once the foundations are there it’s easier to build a mix on top of it.

Levels

We’ll look at Levels today. A basic point but they really are the fundamental that all mixes are built on.

OK, so load up your mix and turn everything down. The first thing that should be turned up is, more than likely, the vocal. 9 times out of 10 it’s the focal point of the mix. All your other levels are based around this. So get it up there at a nice level. Watch your meters, if it’s too high then adding more stuff could well make the whole mix distort, and we don’t want that!

Next we want to look at the core melody. It’ll either be guitars or a keyboard line or the like. Turn it up to a point that the vocal is still clearly heard and not drowned out.

The rhythm section is next. Again, turn up each instrument so they fit with the previous instrument. You will need to manually move levels during the song, like in a guitar solo, but just forget that at the moment. Just get the core stuff right first.

When it comes to drums, it’s always best to “group” all of the drum channels together. Most programmes have a way of allowing all of the levels of a certain instrument to be turned up or down at the same time. By doing this you can raise the whole kit without worrying about ruining the balance you already set for the drums.        
Typical Krecording mix balancing.
Lastly once the drums are up, throw up the bass. Don’t turn it up so the kick drum is drowned out. Let both be heard.

You’ll find having done this that you’ll notice that, let’s say, the rhythm guitar is muddy. If that’s the case then you can think about eq. But that’s a whole ‘nother article or 6!

That’s it for today. Hopefully I’ve left you with a relatively well balanced mix. You can look to the other articles in this blog to help you tweak it. I’ll be back by the end of this week with the next part.

Don’t forget to email me any questions you want about recording or mixing. No question is too stupid unless you already know the answer!

Also if you want to do the STC “Intro to recording course” then call Maggie on 01 6709033.

Thanks for reading,

Andy Knightley

www.krecording.com

Thursday 9 February 2012

Drum Cleaning

Time for another instalment of Simple Mix Tricks!

In this article we take a look at a drum kit and the nasty little problems that crop up when they’ve already been recorded.

Lets say you’ve recorded a drum kit. Normally you’ll have about 8 separate tracks. Kick drum, snare drum top and bottom, hi hats, rack and floor tom and two cymbal microphones. Throw up a balanced mix and, as we talked about in previous articles, have a play around with the phasing and the high pass filter. That should have your kit sounding much tighter.

Next take a listen to the toms by themselves. As the rest of the kit is playing those toms will be singing along even though they’re not being hit. That’s a big problem when you’re looking to get a tight punchy kit.

I’ll assume you’re working on a computer right now (if you aren’t….. well done, rather you then me!). Zoom right in on the toms. You’ll be able to see the spikes where the toms are being hit right there on the screen. Delete anywhere there isn’t a tom hit.

If you listen back to the drum kit now you’ll notice that your kick and snare drum are way more defined. The drone that you probably barely noticed is gone and makes everything much cleaner.

The toms are the only tracks I’d be so brutal with on the kit. You could go and delete other extra noise but be careful that it doesn’t start sounding like a drum machine.

NEVER delete cymbal tracks if the drums aren’t playing during the song. If the drums have been in already your ears will have become used to the room sound that the drums are in. If it’s deleted you’ll notice it straight away!

That’s it for today. I’ve been answering questions on the email address below. Please pop me an email if you want a question answered. I don’t consider any question “stupid” unless you already know the answer!

Also if you want to do the STC Intro to recording course then call Maggie on 01 6709033.

Thanks for reading,

Andy Knightley

www.krecording.com
info@krecording.com

Monday 6 February 2012

High pass filters

I have to start this blog by saying thanks to all those who read the first article. I was delighted that so many wanted to hear my inane nerdy drivel.

I never explained anything about myself in the first edition and I won’t here either. Just head over to www.krecording.com and you’ll see for yourself.

High pass filters

Todays blog is all about high pass filtering. It’s quite a simple concept. Again, like phasing, if you just take a few minutes to pay attention to where it’s needed in your mix then it’ll make a difference.

A high pass filter cuts low frequencies. That is it only lets “High” frequencies “Pass”. It’s a very simple thing but you’ll find just applying it to a handful of tracks will make the low end of your mix much tighter.

On the right is a typical EQ plugin. You can see this is set to High-Pass (HPF) and the frequency that the cut starts from is at 100Hz. You can adjust that number to whatever you want.

So if you’re cutting low frequencies obviously you don’t want to touch kick drum and bass. Unless you’re, you know, dim.

On a typical band mix go straight for the hi-hat. Put an HPF on it and set the frequency high enough so you cut unwanted low stuff but low enough so you aren’t making the hat sound like it’s being hit with a chopstick.

Repeat this for the cymbal tracks and any other tracks that doesn’t need low frequencies, even the snare drum, and you’ll quickly find that your kick drum sounds way more defined. Just be careful you aren’t setting them too high. When in doubt back it off.

You can apply this across lots of tracks: Vocals, guitars, keyboards, synths etc.

Once you have them set, play your mix back at a section where all the instruments are playing, like a chorus. Have a listen to it and then, while it’s playing, turn off all the HPFs. Does it make a difference? It may be small but it all counts to making your mix tighter.

I’ll be back in a few days with another article. Please feel free to email me questions. I’ll be doing a blog later answering questions.

Also if you want to do the course then call Maggie at The Sound Training Centre on 01 6709033.

Thanks for reading,

Andy Knightley

www.krecording.com

Friday 3 February 2012


Introduction and Phasing

Hi Folks,

As part of the new "Introduction to recording" weekend course which is soon to be held in The Sound Training Centre, Dublin I thought it might be a cool idea to blog about some tips and tricks to do with audio mixing.

We'll be going through the actual microphone techniques in the course but there are a few mixing tips that could help you improve your sounds.

Phasing
Phasing. Snore! Well it may not be the most exciting topic when we talk mixing but using it properly makes a massive difference to how your mix will sound.

If you have more than one microphone pointing at an instrument there's a danger the two sounds heard could phase. That means frequencies could cancel each other out and your instrument sounds really thin and generally manky.
I'm not going to get too technical on this matter for the sake of this blog but suffice to say it's a problem that can be fixed easily by moving one of the microphones until the sound is right. If you're stuck with the sound, having being already recorded, though that's a different matter.

Every piece of software weather it's Pro Tools or Cubase, Logic or Sonar, will have some form of phase reverse on each channel. Here we have a typical Pro Tools plug-in. The Phase reverse button is the circle with the diagonal line through it on the right.

Let's say you have two microphones on an acoustic guitar. Well pan them to the center and put a phase reverse on one of the channels. Does the sound get weedy? Well then your phase is fine, take the phase reverse off and be happy you are truly blessed with a god given technique for capturing an acoustic guitar. Does the sound get thicker, more full? Well then you have a phase reverse problem. But thanks to pressing that button it's now solved.

You come across phasing in every aspect of live recording. The best way to deal with it is start hitting those phase reverse buttons and listen to what happens. Check out Drum kits, Bass Mics/DIs and Room mics in particular. You'll find that before you even touch EQ or compression your sound will already be better than it was.

That's it for this week. I'll aim to have one of these every week until the course starts. If you have any questions about mixing then send them to me and I'll try to incorprate them into the blog. 

Also if you want to do the course then call Maggie on 01 6709033.

Thanks for reading

Andy Knightley
www.krecording.com
info@krecording.com